.png "Kodi Builds & Addons | Tech Tutorials | Everything Kodi Builds")
Xenon is a very popular Kodi Build and has been recently updated. It can be installed through the Chef Wizard and has a Kodi 18 Leia version. This Build will work on Windows, Android, Mac, iOS, and Fire TV devices.

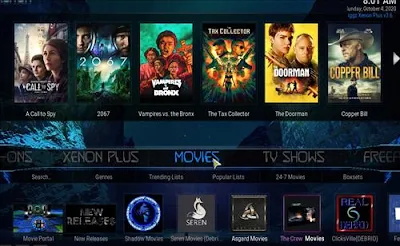
It has sections for Movies, TV shows, library, Sports, TV guide, Kids Zone, Streams, Music, Documentary, Reality TV, Androids, favorites and Arcade.
Your streaming activity is actively tracked by your Internet Service Provider, app/addon devs, and government through your identifying IP address.
Your current identifying IP Address is:
Stream and download anonymously by using IPVanish VPN.
IPVanish will encrypt your connection to the Internet and mask your IP address so you will remain 100% anonymous.
SAVE UP TO $40 WITH THIS TIME-SENSITIVE DEAL
IPVanish backs their service with a 30-day money back guarantee.
IPVanish allows you to use your account on unlimited Internet-connected devices.
everythingkodibuilds.com has No affiliation with Kodi, any Addons, Repos, or Builds. everythingkodibuilds.com does not support or condone copyright infringement. Kodi should only be used with content that is owned or is in the public domain.
Steps to Install Xenon Plus Kodi Build Leia 18
- From home screen go to Settings
- Click File Manager
- Click Add Source
- Click None
- Enter the following address: http://diggzrepo.ddns.net/
- Name it diggz
- The boxes should match the picture below
- Go back to Home screen and click add-ons
- Click the add-on browser from the top left
- Click Install from zip file
- A box will open click diggz
- Click install_wizard
- click repository.diggz-4.0.zip
- Wait for the top right to popup The Diggz Repository Installed

- Click Install from Repository

- Click Diggz Repository
- Click Program Add-ons

- Click The Chef Leia Wizard
- Click Install
- Wait for the top right to popup The Chef Wizard Installed
- It will pop up a information message click Dismiss
- Click Continue
- Click Build Menu
- Click Diggz Xenon
- Click Fresh Install or Standard Install (Fresh Install is usually bests)

- Click Continue
- It will download and install
- Click ok to force close kodi
- After it installs restart Kodi and it should come up. Be sure to give it time to build menus and update add-ons.


